Monday, November 23, 2015

Regency 'fichu' - October (late) HSM Challenge 'Sewing Secrets'

For October's (late) Sewing Secrets challenge, 

I'm a bit late with October's HSM, because I needed to spend my recent sewing time getting my  house reading for my annual Regency Pumpkin Tea last weekend. It's the 9th annual this year, and since we moved early summer, there was still a LOT to do to get ready in time: organizing, unpacking, building furniture, hanging curtains. For that reason, I finished 90% of my HSM by Oct 31st (including the secret pocket) but the final 2 sides of black marabou trim didn't get completely sewn on until mid Nov, thus a bit late on this one.
HSM 'Sewing Secrets' - Regency fichu with hidden innner pocket
First, the finished early 19th century Regency 'fichu' - it's sewing secret is a small pocket sewn on the inside so that you can hide a love note, a secret, or more.
My 'Sewing Secrets' - Inner silk pocket for hiding a love note
How I put it together: I decided to take my draped Regency pelerine as a basis of this 'fichu', and draft up a new pattern: it took about an hour and quite a bit of trimming and pinning muslin to get the shaping right.

Here is my original inspiration fashion plate that I am basing this Regency fichu on:


Here are a few in-progress pics:
Cutting the silk fabric

Hand sewn silk 'fichu'

Silk fabric & lining - 'fichu'


Historical Sew Monthly OCTOBER challenge:


The Challenge: Sewing Secrets: Hide something in your sewing, whether it is an almost invisible mend, a secret pocket, a false fastening or front, or a concealed message (such as a political or moral allegiance).

For this challenge, I hid a small pocket on the back of an early 19th century Regency silk marabou trimeed 'fichu' for a love note or secret letter! 

Fabric: Rusty red burgundy silk taffeta (fabric), medium blue silk dupioni (lining), burgundy silk dupioni (bias binding)

Pattern: none. Draped/drafted by me, based on my draped Regency pelerine.

Year: early 19th century

Notions: black marabou trim

How historically accurate is it? It's based on an early 19th century fashion plate, hand sewn and made from similar materials available at the time: pretty accurate (but not perfectly accurate).

Hours to complete: 1 hour to drape it, 1 hour to cut the fabric & lining, 2 hours to sew bias binding to finish edges, about 8 hours to sew on marabou trim. Gah, sewing on marabou takes forever!

First worn: not yet!

Total cost: All fabric and trim from the stash - I used very little silk taffeta, silk dupioni & marabou - probably about $15-20 total

It looks a bit bright in this flash picture, the silk is more rust red burgundy.

Next up is November - Silver Screen


Regency silk 'fichu' with marabou by theLadyDetalle

Sunday, November 22, 2015

Black silk black marabou hooded cape - Part Two

Finally, here is the finished black silk and black marabou hooded cape: I'm happy with how it turned out:
Black marabou silk hooded cape by TheLadyDetalle
Materials: I used an excellent quality black silk taffeta (bought a few years back in the L.A. Fashion District), with self bias binding trim, lined in black linen (bought from 96th District Fabrics at Fort Fred this past spring for this purpose), and trimmed in black marabou feather boas (bought from JoAnn's).

I followed the same tutorial I used here and here, in creating my pink silk hooded cape, only I changed how far down the front the hood is attached (lowering it a few inches in the front), and also attached the hood to the cape base before adding the bias binding to finish. I trimmed it in black marabou from JoAnn's, following this method, and viola!

This style is popular and modeled after the late 18th century, based on one in 'The Cut of Women's Clothes' by Norah Waugh, but I've been researching capes, mantles, mantlets, capelets, cloaks and related outerwear for a few months now. I have found that the terms are sometimes interchangeable (but not always) and that the shapes and terms changed over the decades, the general shape, wear and use often was similar across decades, so this late 18th century hooded cape is very similar in some cases to Victorian capes. I've also found that things are likely mis-labeled at times and that I'm sure, adds to the confusion.

Here is what I've learned in my research so far (these are generalities and open to future update with more research): Cloaks are long, almost the length of a garment. Capes are generally waist length and lack sleeves (their purpose is to keep the wearer's back warm, and as the garment is so short, sleeves are not needed). Pelerines are waist length like capes, but are longer in the front (almost to the floor in some cases I've seen) and have pointed (or rounded) edges, and were popular across many decades. Pelisses are full length and have sleeves in the Regency, but in the Georgian period, they appear to be mid way between waist length and full length and have sleeves. Mantle is a term that seems to be synonymous with capes; I have founded waist length garments without sleeves described both as capes and as mantles, and I have found waist length garments with sleeves described only as mantles or pelisses. But a few described as a cape. Fichus are generally very small and cover only the top portion of the chest/neck. Capelets and Mantlets appear to be smaller or mini versions of Capes and Mantles respectively.

Whew, it's enough to make one's head spin! Here is a link to my Pinterest board with some of my research, if you want to check it out! So definitely something that requires further research, but this is why I'm calling it a hooded cape for now!

Here is the page from 'The Cut of Women's Clothes' defining this as a "hooded cape."
Page from 'The Cut of Women's Clothes' by Norah Waugh
A few in-progress pictures:
Pleating both sides of the neckline
The big hood (meant to fit over high hairstyles)
Pleating the neckline
And my prior entry: 'Black Silk Marabou Cape - Part One'.

Thanks for reading!


Regency Pumpkin Tea shoes - painting my American Duchess 'Pemberley' shoes mini tutorial

Earlier this year (mid summer) I painted my American Duchess 'Pemberley' Regency flats, and while I plan on adding more to these before they are 'final', I wanted to share a bit about the progress:

The In-progress shoes:
The 'finished' painted shoes!
I decided to be a bit practical and choose to make these shoes for an event that I always have every year: my Regency Pumpkin Tea in November!

So I read through American Duchess shoe painting tutorial here, ordered my supplies (leather paint from AmericanDuchess.com and also from Amazon.com, and petersham ribbon from The Sewing Place), as well as a pair of imperfect 'Pemberley' shoes on sale, and got to work. I had originally planned to make these as a second part to my July HSM Accessorize challenge this summer, but I ran out of time in July to get these done, and also opted not to make shoes for my late 1790's open gown, but instead to make them for Pumpkin Tea. I went all crazy mixing up and painting them with a muted, autumn-y shade of ORANGE, yay!

First, I cleaned my shoes with leather cleaner/preparer (to remove factory finish following American Duchess tutorial), lightly wiping them with paper towel.
Imperfect American Duchess 'Pemberley' shoes - ready to paint
I used blue painters tape to protect the leather bottoms from paint.
Taping up the bottom first
Taping the Inside of the shoes
Then I painted on the first, light layer of paint, a custom orange color I mixed: the first coat ended up being very light indeed!
Painting the first layer
Once I moved on to the second, third, fourth, fifth, and on until the seventh coat, when it finally looked solid and pretty (and you could no longer see the shoe underneath) - making sure to allow enough time for the shoes to dry for a few minutes in between paint coats - probably could let each coat  dry even longer and ended up with less coats for overall coverage, but I wanted to get going with it, lol.

In progress painting
I ended up mixing a custom autumn based orange using: orange, mustard, brown and burgundy.

In future, I'm planning on adding some petersham ribbon trim, and also a protective coat, so I'll post more when they are complete:

I'm really excited about the somewhat finished shoes: I wore them this past Saturday for the 9th Annual Pumpkin Tea, and I loved the way they went with my outfit!

Monday, November 16, 2015

9th Annual Regency Pumpkin Tea - November 14, 2015

My 9th Annual Regency Pumpkin Tea was this past Saturday: it's a time for afternoon tea with friends, a celebration of fall, tea and all things Regency! This was the first year of Pumpkin Tea in our new house since we moved this past Spring, and it was a lot of work to get everything ready in the house, but my honey was a huge help and it all came together in time!
Mom, Kat & I [photo courtesy of Gloria]
This year the event started on Friday, with Kat and Judy coming down on Friday to help with prep, hang out and enjoy a ladies evening. Judy had some last minute sewing on her spencer, I took the time to make a little progress on my (late) HSM for Sewing Secrets, and a lot of chatting and fun was had! Saturday morning went by quickly in tea food prep (a BIG thank you to Kat & Judy for all your help that morning!), and then ladies began to arrive...

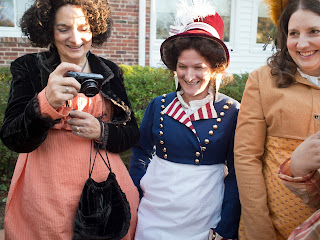
I wore my 'Strawberry Picking' Regency cotton dress I made a few years ago, a turban wrapped by Judy (it kept falling down all day, but I told Judy it was my hair's fault, as turban's never seem to stay on my head), my chemisette, my painted American Duchess 'Pemberley' shoes, [and my P&P spencer for photo time].
Taylor and I having fun during photo time! [photo courtesy of Gloria]
Shoe shot! I'm wearing my painted (orange) American Duchess 'Pemberley' shoes!
On a completely serious side, the weekend was overshadowed by some sad events leading up to it: on Thursday evening, news that a costumer friend from Williamsburg had passed, leaving a husband and two small children, and many, many friends in mourning. She was an absolute sweetheart, well loved by everyone that knew her well: she touched many lives with her warmth and welcoming heart and will be greatly missed. That news was soon followed by the unfolding tragedy in France. It was difficult to set aside the sadness and tragedy for a time.

At the tea there was a lovely group of ladies this year, and as always, we had a yummy table of tea food: thank you to everyone for bringing such delicious dishes! There were a few little blips on the way to the fun besides the above (a burnt finger, 'onion eyes', bad traffic for a guest, a stressful morning for another). I myself had a bit of a rough night on Thursday, and some stressful and not so fun work events leading up to and right before the tea. It was nice though, to try to forget about all that for a time, and to focus on catching up and enjoying each other's company, and I think it all came together when everyone sat down to enjoy tea together!
Yummy tea food!
We did two fun number draws this year: the first for a HUGE fabric de-stash, where quite a few of the guests brought fabric (and trim and a few hats) and each person had 3 minutes to choose a fabric before the next person went. Thanks everyone for bringing fabric to de-stash, especially Isabella, who contributed the bulk of the de-stash!! Everyone came away with some fabric goodies and ideas of things to make with them, and the remaining de-stash fabric will be donated this week to a local charity.
Gloria looking through the massive de-stash pile
The second number draw was for a little gift draw, where I wrapped things I had purged from my own collection that costumers would be interested in (CDs, DVDs, books, fabric, cards, knick-knacks, feathers, hankies, etc.) and everyone picked a random gift and unwrapped it: I purposely wrapped a few extra gifts so there was some swapping at the end - it was great fun, hopefully everyone enjoyed that as much as I enjoyed seeing these things go to good homes!

The tea itself was SUCH fun: I was able to fit one long table into our family bonus room space (by putting two Costco tables together) and it was great that we could all enjoy tea at one table and catch up on what was going on with everyone, life, houses, jobs, families, events, etc. As always, there was some scheming and ideas for future events, which is always fun to discuss and plan, and lots and lots of good fun and tea. I served Cream Earl Grey, Sticky Toffee Pudding and Chocolate Vanilla Mint (no caffeine) at the tea, and kept refilling the Cream Earl Grey teapot especially!

After a time we all went outside (and inside) to get some photos:
Maggie, Jean & Linda [photo courtesy of Gloria]
My mother & I at Pumpkin Tea [photo courtesy of Gloria]
Taylor & I (Stephanie) shenanigans!
Everybody looked AH-MAZING, and there were a few new dresses, and re-wear of some lovely ones (it was all I could do not to steal Kat's French military inspired spencer). A huge THANK YOU to Gloria, of InTheLongRunDesigns, for setting up her tripod and taking these lovely group photos below! It was a touch too cold, so we didn't spend too long outside, just some pictures and then back inside for more fun.
Group photo [courtesy of Gloria]
Wedgie shot [courtesy of Gloria]
Even with the sadness leading up to the event, it was an absolutely lovely Pumpkin Tea, and I very much enjoyed it! A huge THANK YOU to everyone who came, who brought food, helped with prep, brought fabric for de-stash and who made this year's Pumpkin Tea a time of joy and friendship amidst times of pain and sorrow. It was a truly wonderful time with friends this year, that I will never, ever forget!

I look forward to welcoming you back (and others) next year for the 10th Annual Pumpkin Tea: for such a big anniversary, I'm going to plan something fun, so stay tuned for more!

All of my 9th Annual Regency Pumpkin Tea photos here!

Sunday, October 11, 2015

Regency Harbor Day - historical ships & fun!

Our friends Judy & Kat hosted a Regency Harbor Day in Baltimore on Saturday, including a trip to historical Naval ship U.S.S. Constellation (at the Baltimore Inner Harbor), and then dinner at The Belvidere's historical 'Owl Bar,' which was really neat looking decor, very eclectic and cool: and the food was yum!

I loved that my honey joins in, even when he needs a break from the costuming: he was dressed for Inner Harbor but wanted a break in the evening, and he still looks so handsome in his jeans!
My HB & I
The ship was just really enjoyable. I toured it long, long ago in my growing up years but it was like seeing it new again. We sat on benches in the captain's cabin, and planned a candlelit Regency dinner there at the table for 10! Too bad that's never going to happen, lol.
U.S.S. Constellation in Baltimore
Inside the Captain's cabin

U.S.S. Constellation - The tall ship touring group
Judy & Kat
My HB ringing the ship's bell!
At one point they shot the cannon, which was awesome, and then my HB had a good time ringing the ship's bell.

I also 'won' a few costuming awards from Kat, including the very special 'Marabou' award, which I was super excited about :)...I also won an "Elegance" award (not pictured).
Costuming awards
Austenland modern technology award
Later that evening, we met with some more friends at the 'Owl Bar', for delicious food and good company. I was so excited to sew and wear my new Regency pelerine for the evening, and it was so warm and fun to wear!
Marabou fun - photo by Kat
Gloria & I - photo courtesy of Gloria
Group shot at the Belvidere
Group shenanigans at The Belvidere
All my photos can be found here.

Wednesday, September 30, 2015

18th century sewing kit or 'housewife' - September HSM Challenge 'Colour Challenge Brown'

For September's  Colour Challenge Brown challenge, I created an 18th century sewing kit or 'housewife' out of leftover silk scraps, with rose burgundy, blue & brown being the main colors! . 

First, the finished sewing kit / 'housewife':
Silk Sewing kit or 'housewife' by TheLadyDetalle

Silk 'housewife' w/ silk ribbon
An 18th century sewing kit has been in the plans for a long time, but I know so little about them. I've seen these sewing kits popping up at Fort Fred (where I picked up a small version a few years ago made of cotton/linen), and more recently someone made one & posted on LJ. So my mom is currently making a bunch of fabric books (a really cool alternative scrap-booking idea), and I asked her to save the scraps from the outer cover fabrics (one of which I gave her to use), and she gave them to me last weekend and so now I made an 18th century sewing kit or 'housewife' using fabric book scrap as a base.

The scrap was a quilted (low slub) silk dupioni in a rose burgundy, and was JUST too pretty to throw away, so based on my small reproduction 18th century sewing kit and a few images I've seen of like  ones, I decided to put one together, making it up as I went.
Cutting the silk dupioni

First, I dug in my leftovers bin, which is basically leftover fabric from finished projects, and came up with a few pieces to use.
The outside (fashion) of the sewing kit is the rose burgundy quilted silk scrap mentioned above, and the inside I lined with a leftover piece from a reproduction muff for sale in my etsy store, a blue silk dupioni with embroidered wheat (in brown silk).

This was a really quick little project, basically cutting out a piece that is 5 1/4" X 17" in the rose burgundy quilted silk and then the same in lining (blue embroidered wheat silk), pinning and hand sewing on the rose silk bias binding all around, in order to finish the main piece.
Pinning & sewing binding - lining side
Then I added all the various little pieces that make up the needle holder, a pocket, a band (to hold in thread) and more. It was a lot of fun and quick to put together, and I Google'd to get a few image ideas of what to include inside.

I also dug around for a very small piece of blush colored silk dupioni (leftover from my 18th century riding habit waistcoat) for a pocket, a few small scraps of coutil from my Regency stays (for needles), and some brown gold dupioni from my yard sale find silks for binding, as well as some silk ribbon. I also made bias binding for the fashion fabric/front/back of the sewing kit from a small amount of rose burgundy dupioni from my stash (silk sale earlier this year which matched almost perfectly, yay).

Adding the sewing kit pieces
A fun, quick little historical sewing project that incorporated the challenge color BROWN, used stash scraps and from which I learned a bit more about historical sewing kit/'housewives'.

Historical Sew Monthly SEPTEMBER challenge:


The Challenge: Colour Challenge Brown: it’s not the most exciting colour by modern standards, but brown has been one of the most common, and popular, colours throughout history. Make something brown.

An 18th century sewing kit or 'housewife' made of rose burgundy quilted silk dupioni, and lined with blue embroidered with brown wheat silk dupioni, with touches of brown gold & blush finishes.

Fabric: Small scrap of rose burgundy quilted silk dupioni (from mom), small scrap of blue embroidered with brown wheat silk dupioni (from a muff I made previously), bias binding from rose burgundy silk dupioni stash fabric, pocket from blush silk dupioni (from JoAnn's leftover from my late 18th century riding habit waistcoat), white coutil (from 96th District Fabrics leftover from my Regency stays), and some small pieces of brown gold silk dupioni (from yard sale find).

Pattern: No pattern. This came entirely from past experiences in looking/handling small reproduction versions and seeing images online. I guessed at the sizing and details, and used Google to confirm some general images of 'housewives.'

Year: 18th century - going for late 18th century

Notions: Silk ribbon & then small sewing accessories just to show how they fit

How historically accurate is it? It's a reproduction 18th century sewing kit ('housewife') out of close to period appropriate fabrics (silk dupioni is not quite period, but it's low slub quilted and embroidered dupioni, so hard to tell).

Hours to complete: about 4-5 hours total.

First worn: Not worn, will be taken with me and used when I re-enact sewing or want to bring along to an event and sew.

Total cost: Almost nothing. All stash (except the quilted scraps from my mom) and all small leftover pieces from other projects, so I felt very thrifty, which is I'm sure how they made theirs & felt also!
Silk 'housewife' by TheLadyDetalle
Next up is October - Sewing Secrets

Sewing on marabou feather trim - a mini tutorial

A few people have asked me about sewing on marabou feather boa trim...so I decided to do a quick little tutorial explaining how to work with this stuff, and hope that it is helpful!

I used marabou feather boa trim on the following projects: 18th century pink silk w/ white marabou hooded cape, 18th century black silk w/ black marabou hooded cape, my fluffy white modern hat, and most recently, my early 19th century (Regency) cream silk w/ white marabou pelerine.

18th C pink silk hooded cape 
19th C cream silk pelerine
Resources: All of the marabou feather boas I bought at my local JoAnn's or ordered from JoAnn's.com. Link to boas here (also I used sale coupons).

Also on the sidebar (near top) is a link to my Pinterest board of capes, cloaks, pelerines, mantles, and other examples of historical outerwear, many of which have marabou trim OR ermine or other furs.

There are different methods for sewing on marabou trim, and what I used was intended to very thoroughly secure the marabou to the cape/pelerine edges, and minimize the amount of feather shafts (the hard middle part of the feather) that stick up. I did this by securing the marabou every 1/8-1/4 inch instead of every 1/2 or 1 inch or so, which was laboriously and difficult, but ends with a lovely finished product!

Finding the SMOOTH side: Pick up the marabou feather boa and stroke it a few times in opposite directions, finding the smooth side (the side that strokes the feathers down versus standing up). The smooth side direction top will be your top edge. This is what you want to start with, to secure on your cape/cloak/etc. Keep in mind that you want the feathers to smooth DOWN, so if you are starting with the hood, find the middle of the hood at the top, and then start there and make sure the feather boa is smooth going down one side of the hood, then using a separate piece, start again on the other side of the middle ensuring that the feather boa is smooth going down the second side of the hood.

Marabou feather boa, SMOOTH side versus NON SMOOTH side:

SMOOTH side
NON SMOOTH side
The same holds true for the cape or pelerine edges, you want the marabou to lay smooth going down, so ensure that you start at the top and sew down the cape/cloak/peleriene edge, with the marabou smooth side going down (going down the vertical). Areas of the cape/cloak/pelerine that are horizontal can be smooth going either way, so I just continue the smooth direction already in process and keep going.

Sewing it down: Using a needle that has been double-threaded (I used Mettler's 100% cotton), First, you gently cut away the bit of rope at the end of the feather boa, leaving you with only feather shafts (use non-sewing scissors). Starting from the bottom (lining side) hide a thread knot underneath the edge of the bias binding, coming up slightly over the middle on the top edge (above the marabou).

Start your needle from below, hide knot
(View without flash)
Take your needle OVER the marabou (hard to see)
Then take your needle across the marabou below to enter your needle in just on the other side of the marabou trim (so as to cover the feather boa with your double thread and secure it) and come out the bottom side. Again, starting from the bottom, come up slightly over the middle of the top edge (above the marabou), then take your needle across the marabou, covering it with your double thread and through below to come out the bottom side. Repeat a few times in the same area to well secure the cut top end of the marabou boa. Then move on by repeating the above steps to sew down the marabou trim by securing it every 1/8-1/4 inch.

Continue with the above, sewing down all the marabou feather trim using double thread thickness (for securing) and hiding your knots as you go. It's fine if your stitches overlap each other a bit, it will make the marabou edge very secure.

Finishing: Once you have completely sewn on all the marabou trim (keeping in mind it should be SMOOTH vertically), you will now need to 're-fluff' the marabou! The double thread is now holding down (trapping) the fluffy marabou feather bits along the edge, and you will get a beautiful finished edge when you re-fluff it. Taking a needle or pin, hold the marabou up vertically (smooth or rough side doesn't matter).
Gently work out the fluffy feathers to release them from the (now) horizontal threads, picking out a small bit at a time, making sure not to pull too hard. If you pull too hard, the thin shafts of the feather fluff will break, so work gently and carefully.
Fluffing the marabou
See how the marabou is 'trapped' under the thread?

Fluffy marabou again!
Free as much of the marabou feather fluff as you can, and voila! You are DONE!!

Tips and tricks: The marabou feather fluffy bits MAY get caught up in your thread at times. If so, stop pulling and gently work at the area with your needle until your thread is able to be pulled through again. For me, it seemed to happen more with the white marabou boas then the black ones: the white ones were not quite as 'full' as the black ones, so this quality difference seemed to affect how easy it was to sew down without getting caught.

Note: if you are not looking to secure the marabou well and want to re-use it on other projects, you can sew down the marabou trim every 1/2 to 1 inch or more, and it may move around a bit but can be possibly removed later for re-use. I wanted my garments to last so choose the above securing method.

And there you go, I hope this mini tutorial was helpful!