Sunday, August 30, 2015

Regency Pelerine - August HSM Challenge 'Heirlooms & Heritage'

For August's  Heirlooms & Heritage challenge, 

First, the finished challenge, a Regency Pelerine!
Regency Pelerine by TheLadyDetalle
I've long been intrigued by the various outerwear from the late 18th through the late 19th centuries: I've seen them called cloaks, capes, mantles, mantlets, pelerines, fichus or fichus of something, hooded capes, and etc. I've often wondered what is the difference between mantle and mantelet? Is the cloak the same as a cape? what about a pelerine? I have a Pinterest board here, where I gather various extant garments, portraits and inspiring images of examples of all these outer cloakwear, and I have been intrigued with making a few for use in the various time periods. First, I made my late 18th century hooded cape: and now that it was time for a HSM Heirlooms & Heritage challenge, I decided to make a second piece of outerwear that my relatives could have worn.

My family history (like most people's) is intriguing and varied in location and time periods, and whether you are looking at the male line or the female line (of direct descendants) or the side family lines, etc. My family history includes Massachusetts near the water, and would have been cold and even bitter cold at times and warm during summer. Without any specific pictures of relatives prior to turn of the century (1905 or so), I had to go with more what they 'could have worn' versus what they actually wore. Hence, the Regency pelerine, a fashion from the early 19th century meant to keep warm during cold months: a pelerine is outerwear that is waist length in back, and long in front, with my fashion print example going to a point in front. I decided for August's Heirlooms & Heritage challenge, that I would re-create a pelerine from the time that my relatives in MA could have worn about 1805!

Here is my original inspiration fashion plate:
Fashion plate inspiration - pelerine
Pronounced (Pel-er-ine). First I created a muslin for my Regency pelerine, using my draped (hooded) cape as the starting point, and then draping and re-shaping it to mimic the fashion plate shape above. It took two muslins (the first I tried the back part as one piece and the front long pieces seamed in, so three pieces total. the fit was not great. so for the second muslin, I kept it all one piece and it shaped it until it would work as one long piece cut on the fold: bingo!). One piece cut on the fold also seemed to support what you can see in the fashion plate, because there aren't any visible seams.

Here are a few pelerine in-progress pics:
Cutting out the silk taffeta pelerine (on the fold)
Cutting out 2 1/2" pelerine bias silk binding
Pelerine & pelerine lining pinned
and bia binding strips ironed & ready


Pelerine with hand sewn bias binding


Historical Sew Monthly AUGUST challenge:


The Challenge: Heirlooms & Heritage: Re-create a garment one of your ancestors wore or would have worn, or use an heirloom sewing supply to create a new heirloom to pass down to the next generations.

For this challenge, I re-created a garment one of my MA ancestors COULD have worn in the early 19th century, a Regency pelerine! 

Fabric: cream silk taffeta from the stash (silk sale from GoldenSilks.net) and lavender silk from the stash (Jomar).

Pattern: no pattern. I draped/drafted this using my late 18th century hooded cape base as a starting point, then pinning and shaping, making up 2 muslins before I was happy with the shape/fit! I ended up cutting one long piece on the fold.

Year: early 19th century, about 1805

Notions: white marabou feather boa trim from JoAnn's.

How historically accurate is it? It's very historically accurate. I based this directly on a fashion plate example, simply changing the color of fabric and trim a bit. I hand sewed everything (minus a hidden machine sewn tiny seam allowance to hold together the top fabric and the lining until I could hand sew it together with cream silk taffeta bias binding.

Hours to complete: 1.5 hours to drape the pattern, a few hours to cut out fabric/lining and cut out & iron bias binding. An hour to pin on bias binding and a few hours to sew bias binding on. Sewing on the marabou trim is a pain and took a lot of hours, probably 12 hours. Or more.

First worn: not yet! I'm planning on wearing this some time this fall/winter, but not 100% sure which outing yet - a few upcoming Regency costume events in this fall, so likely one of those!

Total cost:
all fabric and trim/notions came from the stash! Cream silk taffeta was on sale for $7 a yard (plus $1.50/yd s&h) and lavender lining was $5 a yard. I used about 3 1/2 yards of silk taffeta (and I pieced the lining a bit; you need 3 1/2-4 yards to cut the silk taffeta in one piece on the fold, and to cut bias cut binding - but I had plenty of fabric left over still). Marabou trim was $5.99 each (I used 4) but I bought them using 20-40% off coupons from JoAnn's.

Next up is September - Colour Challenge Brown

Thursday, August 20, 2015

2015 Plans and Progress!

I realized I never posted my plans for 2015, so I'm doing this now! I created the list back at the beginning of 2015, so I didn't edit this based on where I am now. I am adding a little progress update below.

Plans for 2015:
I am taking part in The Dreamstress' challenge for Historical Sew Monthly, so lots of sewing will revolve around that, and also a focus on Regency for the JAF in England (originally planned to go in Sept. 2015 but delayed a year due to life). Also a focus on getting some things done for my hb, as I delve into men's fashion. Also the year of the muffs and muff insides for my new Etsy shop:

Monday, August 10, 2015

Late 1790's Open Robe Gown - June HSM (LATE) Challenge 'Out of Your Comfort Zone'

First, this is a LATE finish of June's HSM Challenge (finished in July, posting this in early August) - life got in the way, and I missed three months of sewing and HSM Challenges (April, May & June) so I am planning on catching these up (albeit late), starting with the June challenge!

For my late June Our of Your Comfort Zone challenge, I decided to finally create a long planned transitional gown from 'The Cut of Women's Clothes' by Norah Waugh. It's the open robe gown, and is a period I have not yet done, and I was quite nervous to attempt this era when the late 18th century (Georgian) waistline is transitioning to the early 19th century waistline (Regency). I created and finished this gown in early-mid July.

First, the finished gown, worn for the first time at last Saturday's Jane Austen Ball at Gadsby's Tavern:
Late 1790's Open Robe Gown by TheLadyDetalle
For June's HSM 'Out of Your Comfort Zone' challenge, I decided to make a gown that's definitely Out of My Comfort Zone, a late 1790's Open Robe Gown for the upcoming Jane Austen Ball! Here is a link to 'in-progress' on the gown: my late 1790's open robe gown

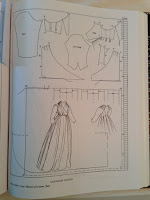
I created a Pinterest board for all my research on late 1790's gowns, which can be found here. This is the picture from the book that I based this on:
Open Robe from 'The Cut of Women's Clothes' by Norah Waugh
Historical Sew Monthly (Late) JUNE challenge:


The Challenge: Out of Your Comfort Zone - Create a garment from a time period you haven’t done before, or that uses a new skill or technique that you’ve never tried before.  

For this challenge, I drafted a transitional late 1790's open robe gown from the book, 'The Cut of Women's Clothes' by Norah Waugh. 

Fabric: A Jomar find: I used about 10+ yards of a (I believe) silk cotton blend with copper sequin spangles stripes - the fabric was a SUPER bargain, and I had to cut around a lot of flaws, holes and ripped edges to make my full open robe dress with train.

Pattern: No pattern. I drafted this by looking at the picture from 'The Cut of Women's Clothes' (I did not scale the pattern, I simply drew general shapes by looking at the shapes in the book, creating two muslins before I was happy with the fit). I used my S&S crossover gown sleeve as the basis of my sleeves, and then drafted/drew an entirely different sleeve to fit my drafted bodice.

Year: Transitional. Late 1790's, probably about 1798-1799.

Notions: Thread, pins to close.

How historically accurate is it? I would say it's very historically accurate. They had similar fabric at the time, and they had metal sequins and the like (these are metallic but not metal) but it passes the close up check. I hand sewed everything that is visible (binding, hem, sleeve binding, etc.) but machine sewed the bodice together and the skirt panels. I hand braided the belt and hand sewed the edges together. The braided belt is 3 strips of the sequin spangled stripe, cut out then braided together.

Hours to complete: A lot! I put this together over about 4 days of stay-cation sewing days, sewing about 8-10 hours a day. Mainly a lot of the time was taken up in drafting/drawing my muslin mock-ups, trying on and making changes until I was good with the fit. The fit was quite challenging as I'm not used to the lower waistline of the transitional time, which was between the high, high waistlines of the early Regency period and the lower waistlines (true waist) of the Georgian period. It was a challenge coming up with in-between look of the late 1790's!

First worn: At the Jane Austen Ball at Gadsby's Tavern last Saturday! My friend from Learning to Costume bought similar fabric at the same time, and we made up our dresses to wear together on Saturday (mine 1798-1799 and hers 1805).

Total cost: So I paid a ridiculously LOW price for my 13 1/2 yards of fabric: $5. It was seriously flawed like crazy with holes, tears, rips and flaws (and the cutter discouraged me from buying any) but the fabric was gorgeous and just spoke to me about becoming a flow-y dress with a train, that I decided to take a chance! I lined the bodice with a purple silk that was about $5 a yard, and I used less than a yard.
TheLadyDetalle & LearningToCostume in their 'matching' fabric dresses
This gown was fun, and now I feel ready to tackle another gown from this transitional era between two historical periods that I really love!

Friday, August 7, 2015

White silk modern hat & black hooded cape progress

I've been planning a white on white and cream hat that I always intended to make last year, but I was too busy, never could find the time, but I told myself I would still make my fun white hat in 2015! I had previously covered a small straw hat (doll's hat probably) with some thick smooth silk and today I finished the underneath, and basically started with this:
Silk covered straw hat - top
Silk covered straw hat - bottom
 And after a few hours of sewing on feathers, tulle, marabou feathers and other fun things, I had this:
White Silk Hat by TheLadyDetalle
Finished silk hat - top
Finished silk hat - bottom
I have no idea where I'm going to wear this, or with what, but I just had to create it!

I also finished the bias binding on the black silk hooded cape today, and then sewed binding on the unfinished edges (where hood and cape base meet and also inside the hood), so now it's time for black marabou!
Black silk hooded cape - pleating necklne
Black silk hooded cape - almost done!
 Friends coming and Jane Austen Ball at Gadsby's is tomorrow, yay!

Saturday, August 1, 2015

Early 19th Century Painted Silk Fan - July HSM Challenge - Accessorize


For July's Accessorize challenge, I created an early 19th century painted silk fan, and finished it last night, just in the nick of time!

First, the finished fan:
Early 19th century painted silk wood fan by TheLadyDetalle
Early 19th century painted silk wood fan back by TheLadyDetalle
For July's HSM 'Accessorize' challenge, I decided to make some period appropriate accessories to go with my late 1790's open robe gown for the upcoming Jane Austen Ball!

I started by doing a lot of research on fans of the period, beginning with late 18th century and going all the way into the early to mid 19th century, to try to get an idea of the timeline and development of the fan and fan use, the materials they used, the changes in style, etc. I also looked into the regional differences a bit, but focused my research mainly on English & French fans of the early 19th century, although I also paid attention to fans that would have been imported at the time (China, India). I was really inspired by the many unique & beautiful fans that are out there, there was so much inspiration to choose from!

My finished fan is made using a vintage fan (as the wood base) from Spain, silk fabric and paint.

There were SO many lovely fans to use as inspiration, so I created a Pinterest board just for my fan research here, and ended up just painting the fan just from creativity in my head after looking at all the inspiration, as I'm sure other amateurs would have done at this time.

I also recalled the beautiful fans that I had seen for sale at times on InTheLongRun on Etsy, and also checked out InTheLongRun's fan blog post for ideas on what type of glue to use (GemTac). Also if there were any special tips or techniques to be aware of. I used wood instead of plastic, so I was experimenting on if the glue would work the same, but great inspiration there.

Here is my original fan:
Vintage fan - (Spain)
Here are a few in-progress pics of making the fan:
First, I very, very gently removed the old fabric lace from the wooden fan slats, being careful not to break them! If I broke them, I would be in trouble. Luckily the vintage glue made it relatively ok to remove the old lace.
Vintage fan - wooden slats with old lace removed
Vintage fan old lace after removal
Top is new silk, right is old lace and left is fan slat pattern
Gluing the silk taffeta to the wood slats
Finished silk fan - ready to paint
And here is the link to the blog tutorial I did on how I re-created this fan:

Historical Sew Monthly JULY challenge:


The Challenge: Accessorize - The final touch of the right accessory creates the perfect period look.  Bring an outfit together by creating an accessory to go with your historical wardrobe.

For this challenge, I decided to tackle my first ever reproduction fan! For over a decade now, I have wanted to create a fan, especially when the opportunity presents to 'rescue' an antique or vintage fan that is pretty much destroyed (but the fan slats are still in good shape - I have a few of those: we'll see if I can bear to use these in salvage even unusable, in original condition they are still SO beautiful). I've been planning this one for over a decade, and I'm finally taking the time to research and do it!

Fabric: Silk taffeta

Pattern: The 'pattern' was made by taking apart a vintage fan and using the original fabric for the mock-up of the new/fashion fabric. Also utilized the basic fan tutorial by InTheLongRun for tips & tricks.

Year: Early 19th Century

Notions: Acrylic paints, Gem Tac glue

How historically accurate is it? Not perfect, but I would say it's similar to what an amateur would have painted for themselves at the time. The wooden fan base is just like what they would have had and created at the time, and the fabric and design, size & shape are period appropriate for early 19th century fans.

Hours to complete: Total - 1/2 hour remove old fabric, 4 hours to cut the silk, glue it all and paint it.

First worn: Will be used at the upcoming Jane Austen Ball at Gadsby's Tavern on August 8th!

Total cost: the fan was $12 on Ebay. The silk taffeta came from the stash.

Next up is August - Heirlooms and Heritage

How to make an early 19th century painted silk fan - mini tutorial

How to modify a vintage fan to make an early 19th century fan reproduction: a painted silk fan mini tutorial. Yesterday I finished my painted silk fan, and wanted to share a bit about how I made it!

First, here is what my finished fan looks like:
Early 19th Century Painted Silk Wood fan by TheLadyDetalle
I did a lot of fan research first, and created a Pinterest board for this research, before getting started with this project. I mainly focused on mid 18th to mid 19th century fans, from France, England (& even China), looking at the type of materials used (wood, bone) and fabric used (lace, silk, cotton), many that were meticulously hand painted with little scenes or a portrait, with little metallic spangles or other decorative bits. I was really inspired by the many unique & beautiful fans that are out there, there was so much inspiration to choose from!

I also checked out InTheLongRun's fan blog post for ideas on what type of glue to use (GemTac). Also if there were any special tips or techniques to be aware of. I used wood instead of plastic, so I was experimenting on if the glue would work the same, but great inspiration there.

One day I'd like to paint a fancy paper fan, use real antique fan slats in a creation, and hand painting tiny little things, although first up is my 'test' run using a vintage fan. that I finished last night!

Here is what my vintage fan looked like: I acquired this on Ebay for about $12.
Vintage fan - (Madrid, Spain - my guess, 1950's?
Vintage fan - back
First, you'll need to very, very gently remove the original fabric. Basically I very gently pulled the lace from the fan, starting at the fan back (the fan back and front are thicker than the slats in between).

Gently continue this process until you have removed the old fabric from the fan back, front and slats in between (starting on one end and working your way to the other). Save the fabric that you removed - you will need this as a template for the fabric you are going to replace it with.

You may want to steam it a little bit, to loosen the glue, if it doesn't come off on its own, but you want to keep the fan back/front and the fan slats very well intact (no breaks), since that will become your new fan base. I was fortunate enough that my fan was old enough that the fan glue was not really holding well anymore, so some gentle tugging and the lace started to come right off.
Vintage fan - wooden slats with old lace removed
Vintage fan old lace after removal

First, I ironed the old lace flat, so that I could use for the 'pattern' for my new silk taffeta fan.
Vintage fan old lace ironed flat - this is my 'pattern'

Then I used the ironed old lace as a pattern to trace and cut out my new silk fan from a piece of silk taffeta. Note: you can trace the shape and save the cutting for later, if you want to paint or decorate the fan fabric BEFORE gluing it to the fan slats. I wanted to see how to glue it together, and make sure it would go on well, so chose to glue it FIRST and then paint the silk fabric once it was already together. Next time I make one, I will likely paint the silk fabric first and LATER glue it to the fan slats when ready.  
Cream silk taffeta fan from 'pattern' - Gem Tac glue at edges to keep from fraying

Following the advice of InTheLongRun's fan tutorial, I used Gem Tac glue along the edges of my silk taffeta (she has done it with cotton/cotton blends only) taking a chance that it would work with silk. It did, it actually worked nicely, so once that was dry-ish (and kind of tacky), I used the original lace back to trace out where the fan slats should be re-attached onto a new pattern. Then I made tiny marks along the edge of my silk taffeta fabric for the fan back, that show me where I should glue the fan slats. 
Top is new silk, right is old lace and left is fan slat pattern

From there I started gluing the silk taffeta to the wooden fan slats one at a time, using Gem Tac glue and wiping away the excess gently (it does darken and 'mark' the silk taffeta, so be aware!). I run a length of glue down a wood slat, then flipped the fan over to line up the fan slat to fit back with it's original neighbors (recall what you want it to look like fully opened - you don't want a lot of room between the slats, you want them to overlap each other slightly). 
Gluing the silk taffeta to the wood slats

I glued and glued and glued and wiped, and glued and wiped until it was all done - it looked quite nice, although the glue definitely darkens the silk taffeta and makes it slightly tacky/sticky. 
Finished silk fan - ready to paint
Finished silk fan - back

And now the silk taffeta fan was ready for me to paint! I didn't prepare ahead of time, because I was planning only to do a basic silk fabric for my first one, but the darkened glue areas made me want to paint it for fun and to cover any flaws, so I grabbed my acrylics and went to down painting it! 

Staring painting - silk fan
Painting in progress - silk fan
Painting done - Silk fan by TheLadyDetalle

I painted this fan to compliment my late 1790's (1799) gown for the upcoming ball, and I like how it turned out for first try! Pictured below in front of the dress I intend to wear this with next weekend!

Early 19th Century Painted Silk Wood fan by TheLadyDetalle
Finished silk wood fan back by TheLadyDetalle
I hope this mini fan tutorial was helpful!